Showing posts with label Cars. Show all posts

Thursday, 9 February 2017

Loud Clunking Metal Sound In Car When Turning The Steering Wheel - Broken Coil Spring

After hitting a patch of black ice one day and helping my car through two 90 degree turns I noticed a clunking metal sound coming from the drivers side when I turned the wheel. The sound didn't happen on every turn of the wheel but would happen each time I completed one revolution of the wheel. It would definitely happen loudly when I was turning the wheel into full lock for parking.

I checked online and had noticed alot of people advising it was the 'CV joint' but as I was due to have my MOT anyway, I decided to kill two birds with one stone and ask that they take a look into it.

The mechanic eventually put me out of misery by telling me the problem was quite common as I had a broken 'Coil Spring'. He said they replace these on cars every single day so it won't take long to fix. In terms of cost he said I was looking at £85 which included my retest and MOT pass certificate.

How to check if you have a broken coil spring

1. Check if you hear a loud metallic clunking sound when you turn the wheel. On my car after the clunk it would resonate a little as the broken spring vibrated.

2. While stationary full lock the wheel to the right and go to the wheel arch where the  sound is coming from. Take a powerful torch and shine it up into the wheel arch.

3. Directly above the wheel you should see the bottom of a large spring. It is tricky because of the lack of space but try to look up the spring as much as you can. If the crack/break is on the bottom of the spring it should be easy to spot.

4. Full lock the steering to the left and repeat if you don't get a good view the first time.

5. If you still can't get a good view and have access to a home jack, Jack the car up and take the wheel off to take a closer look.

At this stage if you can see a break and have the knowledge and tools to fix it yourself then this is recommended, however, if you are like me and have neither I would suggest taking the car to a reputable garage and ask them to put it up on the ramp and confirm the issue.

If this article helped you or would like to share your own experiences, please leave a comment below.


Thursday, 12 January 2017

What Is The Cost Of Replacing A Rear Window In The Back Of A Peugeot 206

Smashed 206 Back Window
I received a knock on the door from a neighbor one day who  said "Sorry mate but I think someone has smashed in the back window on your car ".  Unfortunately there were no parking spaces outside my house the night before so I parked it further up the road towards our local pub  so I wasn't able to see it from my house.

As I left the house and walked up the road part of me was hoping that my neighbor was confused and that somebody else's car had been damaged but unfortunately I was greeted with the scene in the picture on the right which was my car.

I obviously went through the natural emotions that come with seeing your property mindlessly damaged  by someone you will never get to confront  but once I got over that and some inner grumbling about broken Britain, the youth of today and Drunken punters,   I needed to figure out what I was going to do.

The first thing I did was call the police who told me that unless I had  video evidence of who did it they would not be investigating it.  This was not very helpful but they did give me a crime reference number for my insurance company.  When I called the insurance company they told me that I did not have window cover on my policy and even if I did I would need to pay a £250 excess.

It was at this point that I realized that  not only had my property been damaged causing me great inconvenience but it was also going to cost me quite a lot of money to get it fixed.  I called around a few local window repair places and came across one that seemed helpful and well priced.  The other bonus was that they could fit me in the next day which meant that my car only had to be unsecured overnight.

I taped some plastic sheeting to the inside of the back window and the boot as a best effort to keep out the pouring rain (which decided to start as soon as I went to the car !!) and finished up by clearing the broken glass out of the street.

The next day I visited the windscreen repair place and they said that they will get it sorted within the hour  and fit a replacement window.  He told me the back window was actually the worst to get broken because it has the rear heated element running through the glass.

I watched the guy doing the job and everything went smoothly apart from the fact that they could not open the boot. The reason for this is that the glass had shattered and gone down into the frame of the boot and it was actually blocking the mechanism from working.  Thankfully the guys were very used to this kind of issue but he did tell me that the shards of glass get everywhere and although they will do their best they won't be able to get every single piece out because it works its way into the frame of the car.  I wasn't too bothered by this as long as it got fixed and to their credit they did work very hard to try and remove as much glass as possible from the boot. I did occasionally hear a few pieces rattling around as I was driving around but it was nothing major .

Due to the issue with the boot it did take just over an hour to get my car sorted and cost £210  but my window was fixed,  the car was secure again and the rear heated element did get reattached and was working.

I would like to think that my experience was the last piece of mindless vandalism that would take place but I'm guessing as you're reading this it may have happened to you so my apologies. Hopefully you found this blog post helpful and if you would like to share your experience please leave a comment.

Sunday, 31 January 2016

How much to buy a new remote key fob from Peugeot dealership for a Peugeot 207

Less than a year ago I purchased a second hand Peugeot 207. Unfortunately the key fob that was provided only opened the door and started the car manually as the remote function was no longer working. In addition the key was flimsy as the two halves of the key which clipped together had become loose over time.

I had contemplated getting another key or fixing the existing key but I dreaded the expense of it as I had seen some horrendous figures from forums online. However, one day when I was in a rush I locked the car manually and walked off and pulled the key but it didn't fully make it out of the lock. As a result the key snapped in two with little chance of piecing it back together.

So in the end I had to bite the bullet and buy a new key and I thought I would document the full process for others who may have to do the same.

Initial phone call

I called a dealership in my local area and asked how much it would be for a new key and what the process would be. The customer service person took my car details and then said I would need to visit the dealership and bring my log book with me.

Old Peugeot 207 key
The initial visit

Upon arrival at the dealership I sat at the customer service desk and explained the situation. I decided to bring all of the documentation I had received with the car just in case their was anything else required. I was asked for a utility bill to prove my address (which I didn't have with me) but I used my driving license instead.

I was asked for the key fob code card which tells Peugeot the code they will need to program into the key to match my car. I wasn't supplied this with the car so I was told that I needed to pay £19.99 for this in addition to the cost of the key. After signing a form or two and using the £19.99 as a deposit I was told that the key would be ordered and should be back at the dealership within 10 days.

Text and booking

10 days later I received a text telling me that my key had arrived and I just needed to book the car in. I arranged a time for the same week and opted to wait for the work to be carried out as I couldn't get a lift from the dealership.

New Peugeot 207 key
Day of the work

Shortly after arriving I was seated with a service desk person who filled out the paperwork. I was told that the work would take roughly 1 hour 30 minutes to complete  and would cost £142.26. After paying this amount I made my way to the seating area where a staff member made me a coffee while I waited.

After an hour (quicker than I had expected) I was told that my car was ready and I was given my old and new key fobs.

A week later

I received a courtesy call asking if everything was OK with my new key !

Final cost breakdown

Key code cost : £19.99

Lab to carry out programming of key : £48.40
Work to sync key with car * : £70.15
VAT for Lab & Sync : £23.71

Total I paid for a new key : £162.25

*Listed as 'Allocate recall C' & "Allocate prepricke" on statement.

Conclusion

Overall I was impressed with the service that Peugeot provided, however, the cost of the key seems very steep for what you get. Dealerships are known for the their high prices/ripping people off so it didn't come as much of a surprise.

If this article helped you or you have your own experience you would like to share, please add your comments below.

Wednesday, 20 May 2015

Cigarette lighter broken in Peugeot 207

Cigarette-Lighter-Plug
I recently purchased a Peugeot 207 only to find a week later that the cigarette lighter didn’t work. I did some searching on the web to find a solution but there were no clear instructions only random suggestions in forums. I had visited a Peugeot dealer who rather than give me any advice on possible causes could only say that they would charge me £60 just to take a look at the issue.

As a result I decided to investigate the problem myself. I am pleased to report that my cigarette lighter is now working and the problem was just a burned-out fuse. Therefore I will now demonstrate how to locate and change the cigarette lighter fuse in a Peugeot 207.

1. Make sure your ignition is turned off and the key is removed.

IMG_1340
2. The cigarette lighter fuse case can be found within the glove compartment on the passenger side of the car.


IMG_1341
3. Open the fuse compartment


IMG_1338
4. The actual fuses were not apparent to me from the vantage point of the passenger seat so you have to move lower to see them lined up.  The cigarette lighter fuse can be found at F9 and is 30 A.


IMG_1351IMG_1350
5. In order to remove the fuse you will probably need to use the fuse tool that should be attached to the back of the fuse compartment panel.


IMG_1345
6. Use the tool like tweezers to grab the F9 fuse and pull it out.


IMG_1352IMG_1361
7. Inspect the fuse and you should be able to see if the fuse has in fact blown as it will be broken in the middle.The picture on the right shows the fuse I removed and the picture below is the new replacement.


IMG_1346IMG_1342
8 . Take your new fuse in the fuse tool and place it into the (now empty) F9 slot. You may not be able to push it all the way in with the tool but once it’s in the hole you can use your finger to press it all the way in.


IMG_1349
9. You should now have the new fuse in position.


IMG_1350
10. Clip your fuse tool back onto the fuse box cover.


IMG_1340
11. Replace the fuse box cover within the glove compartment.


12. Turn your ignition on and test your cigarette lighter.

You should now be able to use your Sat Nav and light your cigarettes without any problems :-)

If it is a fuse issue it should be really easy to troubleshoot as you can see the breakage in the fuse itself (as shown in the pictures above), however, if the fuse appears to be OK then use a torch to check that no debris has fallen into the cigarette lighter slot as even a small amount can cause it not to function.

Hopefully this has been helpful for you and please leave a comment below to let me and other readers know how you got on.

**Thank you to all the people who have commented so far !!**

The oil cap on my car won’t unscrew

IMG_1319 I recently purchased a new car and once I got it home I checked the dipstick and found that there was little to no oil. Adding oil to the car is so easy even I could do it however when I came to unscrew the cap it would move slightly and then get stuck.

As the panic started to kick in I applied more and more brute force with my hands but unfortunately this did not work. Thankfully the concept of leverage came into my mind and I went hunting for the biggest spanner I could find in my toolbox. I placed this over the cap and then slowly started to turn in the direction it had been moving previously.

I increased the pressure and at a certain point the cap turned and popped out.


I added the oil to the car and then used some excess oil to put around the threads of the cap to make it easier to screw back on.

This is a very simple problem but it may catch a few people out so I thought I would write a post about it.

Hopefully this has been helpful for you and please leave a comment below to let me and other readers know how you got on.

Peugeot 207 water in the footwell

image
I recently had a problem with my Peugeot 207 whereby I could hear water moving from side to side behind the dashboard when I turned a corner. While I was investigating how to solve this problem I read on a number of forums that people were experiencing something similar to this but in their case they were having water appear in the footwell. Some people had mentioned that this water was probably originating from the pollen filter that is under the scuttle (Grill under the windscreen that collects water). I did not have the “water in the footwell” problem but in the process of solving my “water moving around behind the dashboard” problem I did come across the pollen filter and now understand why water is ending up in the footwell for some people.


Pollen filter
In the picture to the right you will see the car with the scuttle removed and arrows pointing to the pollen filter and the drain. The reason why water ends up in the footwell is because the drain gets blocked and water collects until it gets above the level of the pollen filter. Once it reaches this level it flows through the pipework, into the interior and ends up in the footwell. Therefore, the solution to the problem is to unblock the drain located underneath the scuttle.

I have written a detailed explanation on how to go about unblocking the drain on a Peugeot 207 in my post called ‘Peugeot 207 water moving and sloshing around in dashboard which will walk you through it.

Hopefully this has been helpful for you and please leave a comment below to let me and other readers know how you got on.

How to remove the wiper blade arms from a Peugeot 207

Peugeot 207 Sport Blue Most people only have to get involved with their wiper blades when the wiper blade itself needs to be replaced, however, due to another problem I had with the car which involved removing the scuttle (grill under the windscreen) I had to remove the wiper blade arms.

So if you find that you also have to do this please see the instructions below:

1. Open the bonnet - On my car the handle to open the bonnet is in the passenger footwell.

IMG_1321
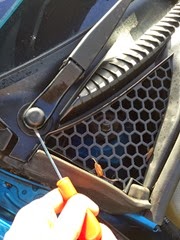
2. Remove the caps on the wiper arms - Use a flathead screwdriver and remove the caps that are over the nuts on the wiper arms


IMG_1324IMG_1326
3. Remove the nuts - Once the nuts are exposed use a ratchet and socket or a large spanner to remove the nuts.


IMG_1328
4. Mark wiper arm position - Use some nail varnish to mark the spindle and the blade arm to show the position that the wiper arms are currently in. This is an extremely important step because if you don’t do this once the work is done and you reattach the arms they might be in the wrong position and will not function correctly.


IMG_1330
5. Remove the wiper blade arms -  Depending on how recently the arms were removed it may be that you are not able to just lift them off. In my case they were completely stuck so I used a large spanner and placed one edge on the spindle and the other edge underneath the wiper arm and tightened. If you rotate the spanner upwards from this position it provides just enough in the leverage to free up the arm for removal.


Putting the wiper blade arms back on

To put the arms back on you just need to line up the nail varnish mark on the arm with the spindle and push the arm back on. Once you are happy these are in the correct position, add the nut and tighten.

To complete the job replace the caps and you’re done.

Hopefully this has been helpful for you and please leave a comment below to let me and other readers know how you got on.

Peugeot 207 water moving and sloshing around in dashboard

image
I recently purchased a Peugeot 207 and noticed that when I turned a corner I could hear a sloshing water sound coming from the dashboard.

I had heard this previously on the test drive and had mentioned it to the dealer but he told me that they had jet washed the car shortly my arrival and the sound was just residue water left in the drains.

He reassured me it would not last long (and why wouldn’t you trust a used car dealer !).
However after a week I was still hearing water moving around in the car and since it had been raining the water volume sounded like it had increased. I looked around online and all I could find were forums saying that the problem is likely to be a blocked drain underneath the scuttle (the grill located under the windscreen).
I am a total novice when it comes to car repair, with the extent of my knowledge being able to drive and fill the car with petrol, therefore, I was looking for some clear instructions and some pictures to help me investigate. Despite a lot of googling I was unable to find a tutorial so I thought I would try and fix it myself and if I was successful I would post the results online to help fellow drivers that have encountered the same issue.

Solution 1
hanger
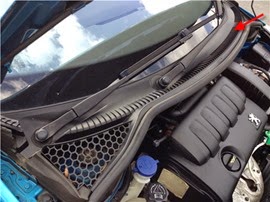
The drain that was blocked on my car was on the passenger side and I realised (unfortunately after completing solution 2) that the drain could probably have been unblocked by using a wire coat hanger strategically fed through the scuttle and into the drain. See picture right.


Solution 2

If trying to unblock the drain by feeding a ‘tool’ through the scuttle does not work you will need to remove a few items to access the drain below. This is quite a fiddly job but it is not difficult.

1. Open the bonnet - On my car the handle to open the bonnet is in the passenger footwell.

IMG_1321
2. Remove the caps on the wiper arms - Use a flathead screwdriver and remove the caps that are over the nuts on the wiper arms


IMG_1326IMG_1324
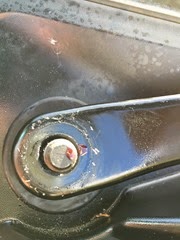
3. Remove the nuts - Once the nuts are exposed use a ratchet and socket or a large spanner to remove the nuts.


IMG_1328
4. Mark wiper arm position - Use some nail varnish to mark the spindle and the blade arm to show the position that the wiper arms are currently in. This is an extremely important step because if you don’t do this once the work is done and you reattach the arms they might be in the wrong position and will not function correctly.


IMG_1330
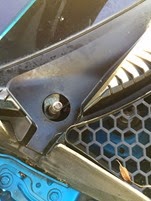
5. Remove the wiper blade arms -  Depending on how often and recently the arms were removed it may be that you are not able to just lift them off. In my case they were completely stuck so I used a large spanner and placed one edge on the spindle and the other edge underneath the wiper arm and tightened. If you rotate the spanner upwards from this position it provides just enough in the leverage to free up the arm for removal.



IMG_1333IMG_1334
6. Remove rubber protectors - Once the arms are removed you need to remove the rubber protectors around the outside of the arms. These should come out quite easily just by pulling them but if they do need a bit of help just gently prise them out with a flathead screwdriver.


IMG_1335
7. Remove the scuttle to expose the drain - Now comes the fiddly part-removing the scuttle. There are no specific clips to hold the scuttle in place but it can be tricky to remove because you have to free it up in stages. The way I did it was to unclip the left side then the right. Then unhook it all the way along the front before finally wiggling it around until it popped out of the groove along the back edge by the windscreen.


puddle
8 . Unblock the drain - As you can see from the picture a puddle of water has formed over the top of the drain and it is this water that I could hear sloshing around.
In order to clear the blockage  I pushed my finger down the hole and the water just poured out the bottom. I used clean water to swill around the area to remove any other debris that could block the drain in the future.


9. Replace the scuttle - Again this was very fiddly because you have to get the left and right sides over the foam panels and then make sure the groove at the back of the scuttle fits snugly against the windscreen. On my car it was difficult to get the scuttle back into this groove so I had to apply a bit of brute force by pressing down on it as hard as I could and eventually by working my way along the length of it I managed to click it all into place. Once I clipped the front edge back in it clicked in even further and the edges were all restored.

10. Replace rubber mouldings  - Place the rubber mouldings back into the holes around the wiper arm spindles.

11. Replace wiper arms - Get your wiper blade arms and line the nail varnish marks back up and push the arms back onto the spindle. Once you’re happy these are in the correct position at the nut and tighten.

12. Replace the caps – Add the caps back onto the nuts and the entire job is complete.

It has now been two weeks since I did this, I have experienced heavy rain in that period and that there has been no further water sounds coming from the car. Now I have seen the location of the drain and know how to get to it if the problem does occur in the future I will probably try Solution 1 first however now that I know how easy it is to do this job I wouldn’t hesitate to do Solution 2 again if I needed to.

Hopefully this has been helpful for you and please leave a comment below to let me and other readers know how you got on.